A successful multi-location signage rollout depends on shared brand standards, separate site checks, controlled artwork versions, and clear approval ownership. Teams should confirm color expectations before production, label each shipment by location, and document installation acceptance. Consistency does not mean every sign must have identical dimensions. It means each sign follows the same approved brand rules while meeting the needs of its location.
Hypothetical example: A retailer planning storefront signs in Sarasota, Bradenton, and Venice has three buildings with different frontage widths. One design file cannot resolve every measurement or mounting requirement. The team needs a shared visual standard and a separate record for each site. This approach helps regional marketing teams, franchise operators, and property managers coordinate production without relying on assumptions or informal email approvals.
What should a multi-location signage plan standardize?
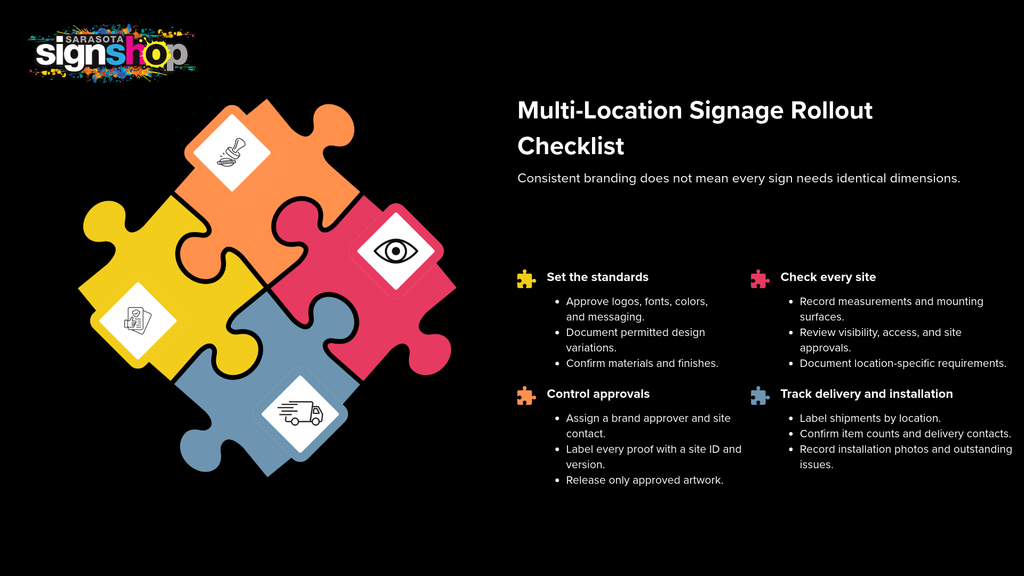
A multi-location signage plan should define which elements must remain consistent and which can change to suit each building. This creates a shared reference for designers, production teams, site contacts, and installers.
Set the following signage brand standards before artwork begins:
- Logo: Specify the approved logo version, proportions, and permitted variations.
- Typography: Identify approved fonts, text hierarchy, and minimum legibility requirements for each sign type.
- Brand colors: Record the relevant color values and how they should be checked on different materials.
- Messaging: Standardize business names, key wording, contact details, and required brand elements.
- Materials and finishes: Identify approved options, while documenting any location-specific exceptions.
- File naming: Use consistent project, site, and revision identifiers.
Visual consistency does not require identical physical sizes. A narrow storefront may need a different layout from a wide facade while retaining the same logo, colors, and message hierarchy.
For recurring projects, multi-location signage production can help connect brand requirements with production planning and fulfillment discussions. Agree on the standards first, then document approved exceptions rather than allowing each site to develop its own interpretation.
What needs to be checked separately at each location?
Each site needs its own survey or documented assessment. Buildings can differ in dimensions, mounting surfaces, access conditions, visibility, and existing signage. These details affect how the approved design can be applied.
Record the following for every location:
- Measurements: Capture the available sign area and relevant building dimensions.
- Mounting surface: Note the substrate and any visible condition that could affect installation.
- Visibility: Consider viewing angles, obstructions, entrances, and the distance from which people need to read the sign.
- Access: Check working space, access restrictions, and any scheduling requirements.
- Electrical needs: Where illuminated signage is planned, identify the relevant electrical requirements for review.
- Approvals: Confirm whether the property owner, landlord, property manager, or another party must approve the design or installation.
Check applicable local requirements for each site rather than assuming the same approvals apply everywhere. Requirements can vary by sign type and jurisdiction, so confirm them with the relevant authorities or qualified project professionals.
For storefront signage, a survey can help establish the usable area and mounting conditions before artwork is finalized. Keep each site’s measurements and notes attached to its project record. If a measurement changes, update that record and review whether the artwork or approved scope needs revision.
How do you keep color and materials consistent?
Color consistency starts with an agreed reference, but the final appearance can vary with the material, finish, lighting, and printing process. A color printed on a rigid panel may not look identical to the same color on a banner or window graphic.
Before production, document the approved brand color values and intended materials. For color-critical projects, ask whether physical samples or material proofs can be reviewed before the full order is released. Check samples under consistent lighting where practical, and agree on how color differences will be assessed.
The team should also record the approved material and finish for each sign type. If one site needs a different material because of its physical conditions, document that exception and review its effect on the overall appearance.
Keep an approved reference with the project records so later orders can be compared against the agreed standard. Avoid relying only on a monitor image or an old photograph, as neither necessarily represents the final printed color accurately.
The aim is to manage expectations and reduce avoidable variation, not to assume that every material will reproduce every color identically.
Who approves artwork and controls revisions?
A commercial signage program needs clear approval ownership. Without it, different locations may approve conflicting designs or send outdated files into production.
Assign one person to coordinate the overall project and identify who can approve brand decisions, confirm site details, release production files, and accept completed work.
| Role | Main responsibility |
| Brand approver | Confirms logos, colors, messaging, and visual standards |
| Site contact | Verifies measurements, access details, and location-specific needs |
| Production contact | Checks supplied files and confirms the production version |
| Installer | Works from the approved site scope and reports installation issues |
Each proof should identify the site, revision number, approver, and release status. For example, a file marked “final” should not enter production unless the required approval has been recorded.
Use a simple version system, such as SITE-02-Proof-v03, and maintain a central record of the approved files. When a revision is made, state what changed and which earlier version it replaces. This makes sign proof approvals easier to track across multiple teams.
The commercial signage examples can help with early discussions about sign types and visual approaches. However, reference images should not replace approval of the actual artwork, dimensions, materials, and site details for the project.
How should production, shipping, and installation be phased?
Plan production and delivery around each site’s readiness, not just the total sign quantity. A multi-site graphics installation can involve different access windows, delivery contacts, and installation requirements. Confirm the proposed schedule, geographic coverage, and logistics with the sign provider before committing to dates.
Use a location-specific schedule to track each site’s progress.
| Site ID | Sign size | Proof version | Status |
| SITE-01 | Confirmed per survey | Approved v02 | Ready for release |
| SITE-02 | Confirmed per survey | Awaiting approval | On hold |
| SITE-03 | Confirmed per survey | Approved v03 | Delivery planning |
Illustrative schedule only. These are example records, not actual customer data.
Label each shipment with the site ID, sign type, item count, and delivery contact. Keep packing information linked to the approved artwork and installation instructions. Before dispatch, confirm that the destination can receive the order and that the installation area is ready.
In the hypothetical retailer project, the Sarasota site may be ready before the Bradenton and Venice locations. The team could release the approved Sarasota signs first, provided production capacity, delivery arrangements, and the project schedule support that approach. The other sites remain tracked separately rather than being treated as ready simply because the first shipment has left.
This kind of signage project management makes delays and outstanding approvals easier to identify. Confirm whether signs will be delivered together or in phases, and agree on who will report receipt, installation progress, and any problems.
What should your completion checklist include?
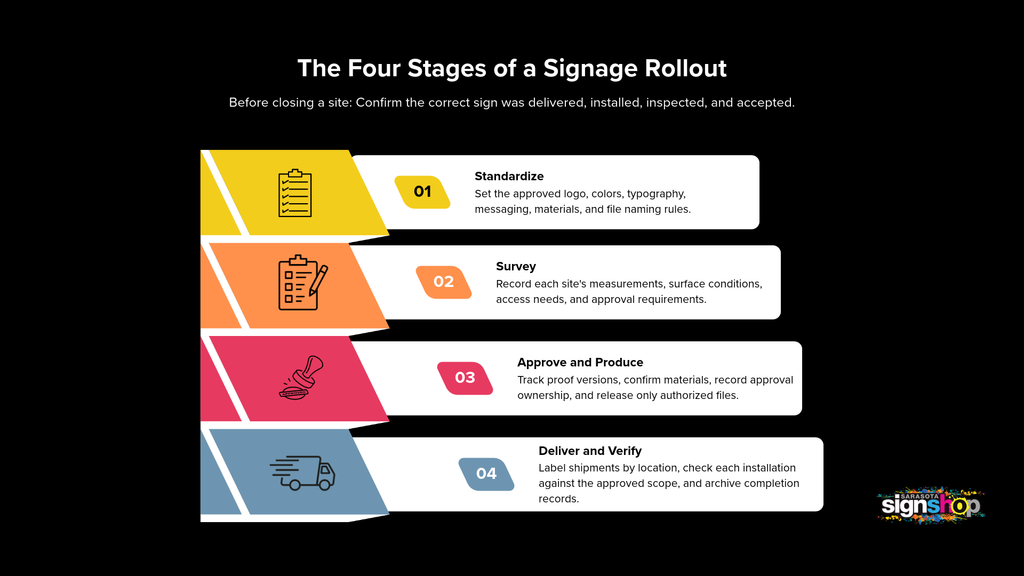
Delivery is not the same as installation acceptance. A box arriving at the correct address does not confirm that the right signs were installed in the right places.
Use a separate completion record for every location:
- Correct items: Confirm the site ID, sign type, quantity, and approved artwork version.
- Condition: Check for visible damage or missing components.
- Placement: Compare the installed signs with the approved scope and layout.
- Photos: Record completed work where permitted and useful for project documentation.
- Outstanding work: Assign a named owner to each issue and record the agreed next step.
- File archive: Retain the approved proof, final production files, and relevant site notes for future orders.
Keep shipment receipt and installation acceptance as separate statuses. If a sign is damaged, incorrectly placed, or inconsistent with the approved scope, record the issue and arrange a review before marking the location complete.
Conclusion
A well-managed multi-location signage rollout combines shared brand standards with accurate site records, controlled artwork revisions, and documented completion checks. The process helps teams maintain a consistent identity while accounting for differences between buildings, materials, and installation conditions.
Before planning your next rollout, gather the location list, required sign types, brand assets, site measurements where available, and preferred delivery or installation sequence. Sarasota Sign Shop can discuss the production requirements and project-specific coordination options for your locations. Confirm the proposed scope, geographic coverage, and schedule before work begins so each site has a clear path from approval to completion.